Thursday, December 22, 2016

Spotlight interview with self confessed 'Education Junky,' Tina Giunta, CBA, of Shivoo Balloons, Melbourne, Australia


Tina Giunta
Tina first discovered balloons 16 years ago when she saw balloon creations in the window of her local party store.  This inspired her to make her own centrepieces for her son's Christening. From this event, Tina was asked to decorate parties for friends, and before long she found herself decorating almost every weekend!

So what attracted Tina into running her own balloon business?

"I only really registered a business name so that I could buy at wholesale prices. It really was just a hobby for me. But as I mixed in circles with other young families, surrounded by young mums who were very supportive and encouraging while word of mouth kept spreading, I found myself just falling into running a business."


How did you learn to work with Balloons?

"In the beginning, I would study my Balloon Images Magazine and the Qualatex® catalogue, and I would just try and work things out. My work was quite basic back then and I found that this was enough. But as my hunger to try new products and more complicated designs grew, I looked into attending classes. My local supplier told me about the Australian Balloon Convention that was being held about an hour away from my home, so I decided to attend —and well, obviously I got hooked!"

Can you tell us a little bit about your business?
"My work space is a warehouse with an office. It's 100 square feet with an extra 50 square feet of mezzanine. We are not a retail store so we don't open to the public, but on occasions people will make appointments to discuss what they want. My website has hundreds of photographs on it, so most people prefer to just email or call.
I have one part-time employee and use contractors for the bigger jobs. My contractors are people that I have built a very good relationship with over the years. They run their own businesses, so they are experienced and have good working ethics."
Confetti Balloons
Beautiful confetti balloons by Tina Giunta

What advice would you give to someone who is just starting a balloon business?
" Learn your craft is your number one priority! Attend classes and conventions as much as possible so that you feel confident in what you offer your customers. When you believe in your work and you genuinely love what you do, people will see that in you! They feel your excitement towards their event and it makes them feel special. Once you have their trust, it is so much easier to get them to part with their hard-earned money!"
 What industry events have you attended during your career?
"I am an education junky! I attended every class and convention humanly possible in Australia and three World Balloon Conventions, one of which I attended as a scholarship recipient and the most recent as an instructor. 
1st Place Medium Balloon Sculpture.

Tuesday, December 13, 2016

Elegant Air-Filled Hanging Decor by Luc Bertrand.

The fabulous Luc Bertrand, CBA, of Waw Balloons in Vichte, Belgium, shares another one of his truly elegant designs that would work amazingly well for a New Year's celebrations. I also believe that this design would be fabulous for a store window display or decor for elegant black tie events.

Luc is a master at using the Qualatex® Number Shapes to create elegant air-filled decor, and this beautiful design is no exception! As soon as I saw this design, I thought of the Fleur de Lys shape and saw how incredible, unique designs can be created using Luc's technique.

Materials required: Choose colours to suit your occasion or event.

2 - Number Six or Number Nine Microfoil® Number Shape balloons.
3 -13" Taper Microfoil balloons.
1 - 27" Taper Microfoil balloon.
11 - 5" Latex balloons.
1 - 260Q to tie all the elements together.
Click-Click™ Stretchy Balloon Tape®.
Heat Sealer.
Hand-pump or an electric air inflator suitable for inflating foil balloons.


Step 1.
  • Air inflate the two number balloons and secure together using the stretchy tape.
  • Air inflate all the Taper balloons. The 13" Taper balloons will require heat sealing. If you are not familiar with heat sealing, check out my post: "Heat Sealing Microfoil Balloons and Turn those Little Balloons into Big Profit Earners."
  • Tie one of the 13" Tapers balloons to the 27" Taper balloons and tie the other two 13" Taper balloons together.  Attach an un inflated 260Q balloon at the joint so that this can be used to connect everything together.


Step 2.
  • Connect the Tapers to the Number shape balloons as shown below using the 260Q. 
  • Air inflate  two 5-balloon clusters using the sizes as indicated below and with one of the clusters add a centre balloo. This cluster will be positioned at the front of the design, and the other to the back of the design. Now connect the clusters as shown below, once again using the 260Q. 

The Very Best Balloon Blog


The Very Best Balloon Blog


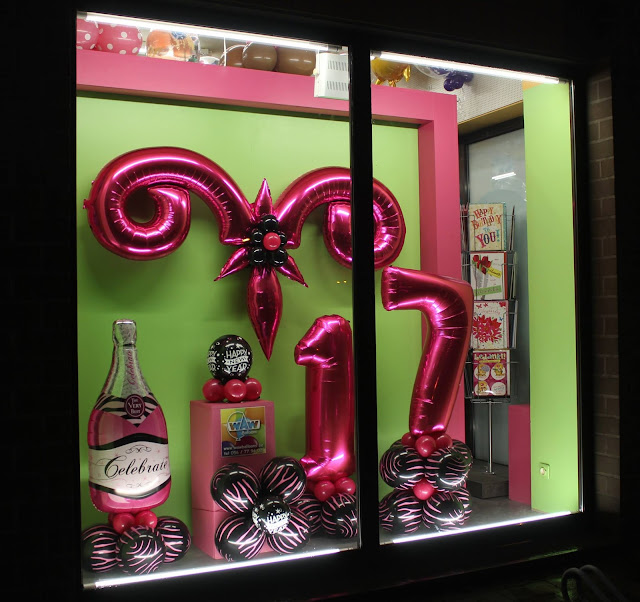
This is a photograph of Luc's current window display for New Year's! I love the vibrant colours and the use of the "Celebration Pink Bubbly Wine" balloon with the "New Year Confetti Dots" balloon along with the number one and seven to make 2017! 


The Very Best Balloon Blog


A huge thank you to Luc, who every year never fails to share a wonderful design with us for either Christmas or New Year's! 

Happy Ballooning!

Sue
www.suebowler.com


Tuesday, December 6, 2016

Tip and Tricks of the Trade - Part 4 Controlling a Bubble Balloon® for vinyl application

20" Deco Bubble, with 16" White latex inside.
U.S. Patent No. 6,782,675

I recently taught a class showing different ideas and techniques working with Qualatex® Bubble Balloons and turned to Chris AdamoCBA, of Balloons Online, in Sydney, NSW, Australia, some weeks before I was due to teach the class to ask him what technique he used to "control" a helium-filled Bubble Balloon whilst adding vinyl and how to ensure that the text or image was centrally positioned. Chris has already showed us how to add vinyl transfer to flat foil balloons along with how to make confetti filled balloons in "Tips and Tricks of the Trade- Part 1," and I thought that he would be the perfect person to ask!

Chris confessed that he had not worked out a specific way, but would be very happy to work on it! We discussed a few ideas and Chris went away to play!

Within no time, Chris had devised the perfect solution —a cardboard jig, something that we can all make very easily from a cardboard box and a few un-inflated 260Q balloons! 
The video clip below gives you full instructions on how to make your Bubble Balloon into a solid colour Bubble, how to make the Bubble jig, and how to add the vinyl to the Bubble. For all you vinyl users, this is the coolest tip ever!


When I arrived at the Slovenia Qualatex Event, my first job was to make my jig, as I knew that I would need it to help me to prepare for my class. In fact, I made two: one for 20" Bubbles and the other for 24" Bubbles. They did not look pretty. Sadly, I did not take any pictures, but my goodness, it really made a huge difference when working with my Bubbles! When I showed it to the delegates in the class, they all thought that it was a wonderful, tool! 

So a huge thank you to Chris, who once again shares an amazing, time-saving, and extremely useful tool with the balloon world!

Happy Ballooning!

Sue
www.suebowler.com