Showing posts with label Balloon Sculptures. Show all posts

Wednesday, October 20, 2021

It's All About the Framework

I am always in awe of the incredible balloon sculptures and those who build them. I have to confess, this style of balloon design is definitely not something that is within my skill level. There is a great deal of detail in the planning and preparation.

Something that I was told very early on in my ballooning career is that a balloon sculpture is only as good as the frame that it is built on, and I could not agree more! 


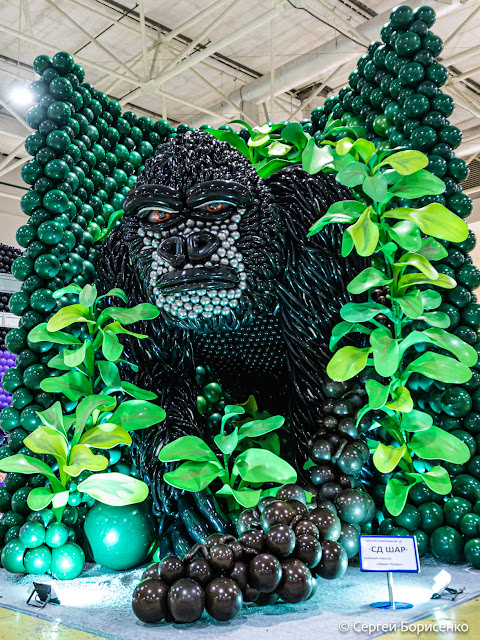
At the recent Moscow Balloon Festival, the Qualatex sponsored team, Alexander Solomatin, Vadim Shushkanov, Dmitry Novikov, Vadim Nesterenko with other fabulous artists created this incredible Gorilla sculpture! I have always loved the work of Alexander Solomatin, Vadim Shushkanov and Dmitry Novikov. Every sculpture that they have ever created has been outstanding, but for me, this has to be one of their very best! 

When I first saw this sculpture, I was as impressed with the framework as I was with the end result! 


As I stated at the start of this post, it's all about the framework, so today, I would like to talk a little bit about frames and what you will need to make them.

As with any design, you will first need to determine what you are going to make. This could be something specific for a client or it might be your opportunity to build a sculpture for a competition.

You first need to determine how your sculpture is going to be supported. For example will it be suspended or freestanding? Taking all aspects of the job into account will help determine how ridged the framework needs to be.

The three basic framework materials that are used by balloon specialists are PVC pipe, EMT (or conduit); and aluminium rod. Looking at the framework below, the majority of the frame is made from different thicknesses of aluminium rod, with thicker rods for the main structure and thinner rods for the detail on the face and arms. Once the frame structure is made, it is carefully wrapped in a strong netting or sometimes chicken wire, which is how the balloons are attached.


PVC PIPE

PVC pipe is the white plastic pipe commonly used for plumbing and drainage, and is readily available from home-improvement stores. PVC stands for polyvinyl chloride. PVC has an extremely durable nature, and is lightweight, making it an appealing material when constructing sculpture frames. It comes in many different sizes, but the most commonly used in the balloon industry is the 1/2" - 3/4" piping as you can easily add balloon clusters and it is also easy to cut and bend. PVC piping can be used to create arches and circles, and when heated you can create right angle bends and curves within the piping.

EMT/CONDUIT

EMT, also called conduit, is tubing used by the electrical trade to encase electrical wires. It is readily available for purchase from hardware and home-improvement stores.
Like PVC, conduit comes in many sizes from 1/2" to 1" and in a variety of different lengths. 
EMT can be bent using a pipe bender tool, these are also available from hardware stores. Conduit can be cut with a hacksaw, but the preferred method is to use a pipe cutter.

ALUMINIUM ROD

Aluminium rod and bar is produced by several different processes namely extrusion, rolling and coiling, or drawn directly from molten aluminium. Aluminium wire is used primarily in electrical transmission applications due to its superior conductivity and non-corrosive nature. Though aluminium rod is generally not available from hardware or home-improvement stores, some balloon wholesalers also sell it and it is also available from metal suppliers.
The most common sizes of aluminium rod used by balloon artists are 3/16" (4.76mm) , 1/4" (6.35mm) and 5/16" (7.93mm), however, there are many sizes available. The thicker the rod, the more difficult it is to bend.
The best way to cut aluminium rod is with bolt cutters. Investing in a good pair will help you to save time and energy! 
The easiest way to bend aluminium rod is to place a 4" - 6" length of EMT over the rod when bending to give you leverage. Make sure to keep the rod flat when bending it so that the frame does not warp. With lots of small bends, patience, and practice, you will create some great looking frames! 
Duct tape is the best method for securing aluminium rod frames. When taping two parallel pieces of rod together, overlap them by at least 4" - 6". If you are taping two perpendicular pieces of rod together, male and "L" shape first, then tape both ends securely. Duct tape can also be used to cover the sharp ends of the rod and EMT too.

BASES

To support your framework construction, you will need heavy bases. These are not so easy to buy off the shelf these days, so you may need to look into having some made for you. Steel base plates are the best, especially for outdoor work. Wooden bases, though not as heavy as steel can be weighted down by adding additional weights. 


When I visit events such as the Moscow Balloon Festival, the World Balloon Convention and other ballooning events, I love to watch the sculptures being made. 

Who cannot be spell-bound by those riveting eye's in the picture above! And for anyone who loves Fantasy Flowers, those leaves are made from 3ft balloons stretched on an aluminium rod... I tried this once without much success.


The Team!
Alexander Solomatin, Vadim Shushkanov, Dmitry Novikov, Vadim Nesterenko, 

I know that the Russian team loves to compete, and I asked Vadim to explain why?

"For me, there are two of the most important benefits of balloon contests. First of all, every competition is a great opportunity to create a sculpture you hardly ever make in different circumstances. Almost all of the balloon competitions in the world relate to art, not business. There are no customers with their wishes and requests, you don't need to think if somebody can buy your work, you're completely free to share your thoughts and ideas through balloons. Isn't it the best option to feel like a true balloon artist?

And secondly, each competition makes you improve your professional skills. If you would like to build an impressive sculpture, you have to solve a lot of problems. You need to search and try many colour combinations, balloon technics, methods and materials for frames or create something completely new. This sort of experience always rises your professional level and gives a huge background for using in everyday work."

I hope that you find this sculpture as incredible as I do! If working on a large sculpture like this is something that appeals to you, I recommend that you attend a balloon event/convention that has a large sculpture competition and sign up as a helper. It will be one of your best experiences ever, and who knows, it may lead you to entering  your own sculpture one day! 

Happy Ballooning! 

Sue

www.suebowler.com

Follow me @suebowler


Sunday, May 16, 2021

From Unicorn's to Fairies - Whimsical Theme Decor Perfect for Summer Parties

There is something simply enchanting about Unicorns and Fairies! It is such a magical theme when it comes to creating decor! This magical idea is perfect for birthdays, new baby celebrations and baby showers too!

I am not traditionally a lover of outside decor, primarily because of all the problems that you can incur when putting balloons outside, (I will revisit this later in my post.) However, there are also many benefits when creating a fairy theme party outside! It's all about setting the scene and outdoor space that will allow us the opportunity to find the perfect setting! 

Sculptured Balloon Number by Sue Bowler, CBA.

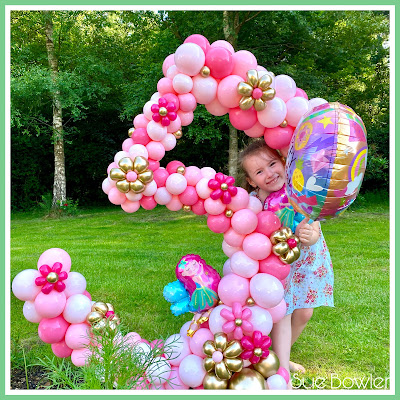
During the pandemic I created decor for my Granddaughters 5th birthday, due to COVID restrictions, we had to have an outside party, and to be honest it was absolutely perfect as the extra space allowed me to be a little more creative.

Unicorn by Sue Bowler
Unicorn Column by Sue Bowler

Garden Decor by Sue Bowler

If you would like to learn how to make the Air-Filled freestanding Unicorn Design, and other simple balloon ideas to use outside, check out the video below.


If you would like to learn how I made the Number Five that I made for Alexa's birthday, check out the post that I wrote last year: How to Make a Styled Framed Number, and Make a Five Year Old Very Happy!  or click HERE
 Here is a little more 'Unicorn' inspiration!


Rainbow and Unicorn by Sue Bowler


Rainbow by Sue Bowler


So what are the factors to remember when working with balloons outside? 

You need to be aware that:
  • Balloons will swell and expand in the heat.
  • Darker balloon colours will absorb heat and pop faster.
  • Balloons will oxidise (go misty and cloudy) and lose their clarity.
To combat these issues, follow these rules:
  • Firstly, use quality balloons such as Qualatex®; quality makes a huge difference. 
  • Use much larger balloons than required. 
  • Work with 16¨ latex balloons rather than 11¨, and under-inflated them. A 16¨ balloon should not be inflated to greater than 12¨. This will allow the balloons to expand with the heat. If using 11¨ balloons, do not inflate them to any bigger than 7.5¨.  Always fully inflate balloons to their maximum size and then deflate until you reach the desired size. NOTE: Just under-inflating a balloon will make little difference. The idea is to stretch the balloon to its limit and then let it down to size. This will make the balloon more durable and less likely to pop in the heat.
  • Use light-coloured balloons and avoid using dark colours. Use accent elements such as ribbons to introduce the darker colours into the decor.
  • Plan for the balloons to oxidise. This is not a bad thing, it merely changes the visual texture of the balloon. Explain in advance to your clients that the balloons will look more “velvety” and acquire a rich, matte finish.
  • Use white balloons as much as possible; they reflect the sun and fade less.
  • When working with framework and poles, ensure that you cover these in white duct tape or wrap with white modelling balloons. This will help to keep the framework and poles from getting too hot.
  • If working with helium-filled balloons, keep in mind that extreme heat speeds up the balloon diffusion process. So, in high temperatures, helium will escape much faster than normal, drastically reducing float time. If you can find a way to provide shade for the balloons, it can slow the process.
  • Do not use water to cool down balloons. As the water dries on the latex, it becomes slightly sticky. The balloons can stick together, causing them to pop as they expand in the heat or move with the wind.
  • Use Qualatex Bubbles™️ and Deco Bubbles whenever possible as they can withstand the sun, rain, and wind, making them much more reliable for outdoor decor.
Summer time is the perfect opportunity to create some fabulous outdoor party décor and further inspire your customers with fun and exciting ideas! If you are struggling for good photos, why not set a party in your own garden? This will give you the opportunity to practise, and get some great photographs... that's exactly what I did! 

Happy Ballooning! 

Sue
Follow me @suebowler


Tuesday, July 5, 2016

David Mahoney shows us how to create fabulous decor using the Balloon Overlay technique.

Balloon overlay is a technique that I have seen used by a number of different balloon artists over the years to create amazing logos and two-dimensional balloon sculptures. The techniques used vary slightly, but the end result is pretty much the same.


David Mahoney of Balloons Everyday in Carrolton, TX, U.S.A, is a great friend of the Very Best Balloon Blog. Once again, he kindly shares his knowledge and passion and shows us how to make these wonderful overlays in a few simple steps.

Overlays are a great way to create a custom design, especially if a customer does not have the budget for a three-dimensional balloon sculpture. David has mastered the technique and  acquired many happy customers in the process.

Materials

Most of the supplies needed for balloon overlays are available in hardware stores. Foam core or foam board can be found at art supply stores, craft stores, or sign shops. Overhead projectors and transparency film can be purchased at office supply stores or try searching online. Some audio visual stores may also have projectors for purchase or to rent.


1. Find the image you need to create your shape. Copy or print the image onto transparency film.


2. Use an overhead projector to project the image onto your foam core or foam board. 


Trace the outlines with a marker. You'll be tracing two elements separately on different pieces of foam core: the "backing board"
that  the balloons will be added to, and the "detail pieces" that will add depth and detail to the sculpture.


3. Use an X-acto blade or hobby knife to cut out all the foam core pieces.


4. Spray paint the front side of the foam core to match the colour of the balloons that you will be adding.


5. Determine balloon size by finding the largest and smallest width in the design and decide on a size that will fit nicely in both areas. Typically on small designs, the balloons are 3-4". On larger designs, balloons are usually 6-8" in size. Inflate your balloons and tie each one individually, keeping the necks as long as possible.


6. Poke holes so that you can add your balloons to the backing board. To do this, you will need two awls and a foam Duplet template (as shown) that matches the size of your inflated balloons. Position the template on the edge of the backing board and poke the awl through both sides. Remove the first awl and rotate the template over to the other side of the second awl. Poke a third hole. 
An awl is a long, pointed spike.  A Bradawl is a tool for making holes in wood.

7.  Repeat Step 6 until you have poked enough holes evenly throughout the whole backing board.


8. Poke the necks of the inflated balloons through the holes in the backing board, using a small wooden dowel to push them through.


9. On the back side, stretch the necks of the adjacent balloons to tie them into pairs.


10. Once the backing board is covered, add the detail pieces. To do this, tape an uninflated 260Q onto the back of the detail pieces, then use an awl to poke additional holes into the backing board to slide the 260Qs through. Tie the 260Q ends on the back side.


11. Glue 1 x 2" wood strips to the back of the backing board to support and secure Electrical Metal Tubing (EMT) and EMT straps. THEN PLACE the tubing into base plates. 

Balloon Overlay Benefits
  • High impact
  • Ideal for corporate clients and private parties
  • Simple to construct; no difficult techniques or framing required
  • Budget-friendly option for customers who want a custom sculpture
  • Easy to add details on the front to create any image, sign, logo, or character

Here are some more of David's wonderful overlay designs.


Download this great PDF and keep it safe for future reference.


I think that this is a great technique and one that could be used for many different design ideas. Thank you once again, David, for sharing your skills and knowledge with the balloon industry! 

Happy Ballooning!

Sue
www.suebowler.com

Monday, September 9, 2013

From professional tennis player to professional balloon artist.... Fiona Fisher 's incredible journey!

very best balloon blog
Fiona Fisher CBA


Well known for her amazing balloon sculptures Fiona Fisher's balloon career has grown from strength to strength since she first discovered balloons in 1999!
Fiona has very kindly shared her 'balloon adventure' with the Very Best Balloon Blog...


I have had a very varied working life over the past 36 years:  professional tennis player, antique furniture restorer and cabinet maker, cafe owner and finally, a balloon artist. 

Monday, August 5, 2013

17th JBAN 2013

JBAN - Japan's Balloon Artist Network with Emily's Balloons presents it's 17th Convention in Tokyo, Japan!

This is the second time that I have been invited to teach at JBAN and on each occasion I have found it to be a truly magical experience.


This years JBAN theme was 'CARNIVAL', a truly great theme used as inspiration for some of the competitions and of course the final night party!

There were 5 competitions including Large Sculpture -no theme, Photo Spot (a place to take photographs) - Carnival theme, Helium Bouquet - no theme, Hat - Carnival theme and a Twister Live... twisters showing off their skills to an audience.

Monday, April 29, 2013

BACI 2013 - 'Stars'

BACI 2013 was all about 'Stars', everything from celestial, whimsical, astrological, marine life or the famous, STARS could be depicted in any and many ways! 

 I would like to thank The Darkroom photography school and Balloon Express, Italy for the use of the sculpture pictures! To see more great pictures visit the Darkroom photography website...    www.thedarkroom.it


The Darkroom photographers
Francesco Mauro
Annalisa Cavallari
Alessia Fabbri
Giulia Zanelli
Ilaria Vangi
Jessica Cannizzaro
Sara Piazinni
Silvia Collino
Silva Rocchi
Valentina Borgioli

The event started last Thursday - April 18th, when the sculpture teams had the opportunity to start building the structure or frames... but no balloons can be inflated!


Framing byTeam Alberto Falcone!
Framing by Team svetlana lugovaya
With the frames well on the way to being completed the first day of the sculpture build started in earnest. Each team could have up to 10 members and had 2 days from 8am-8pm (24 hours in total) to complete their sculptures.

And the winners are...

Tuesday, March 12, 2013

Ninja Turtles Down Under... awesome balloon sculptures!


Last week I arrived in Sydney, Australia for the start of my Deco Fusion Tour with Qualatex Australia! 
I was not the only person busy working with Qualatex balloons, Matt Falloon and a group of talented artists were busy building 'Ninja Turtles' at Darling Harbour.

I asked Matt if he would tell me a little bit about his amazing project...

The Turtles:

The Ninja Turtles came about because of another balloon twister friend of mine being unable to take a job of this level due to full time work. He graciously passed it on to me.


I tapped into the loose network that had been set up in Sydney of balloon artists, Face painters, clowns, magicians, and some who are all of the above, and asked them to be involved.

I had a great response! I ended up with a team of about thirteen twisters, all of varying skill levels, from all over Sydney and the Central coast, all of which had volunteered with no thought of payment. (There was a modest payment allocated in a very tight budget).

Thursday, October 4, 2012

13th International Moscow Balloon Festival

25th- 28th September saw the 13th International Moscow Balloon Festival.


Wow, I cannot believe that it was the 13th Moscow Balloon Festival this year! And although I did not attend this time, I have attended a number of the festivals over the past 13 years my first being in 2002! Each and every year I am amazed and dazzled by the balloon artistry and skills that are shown at this event by the many very talented balloon artists! 

A huge thank you to John Bowler (hubby) who did attend the festival representing Conwin. John took these great photographs and has kindly shared them with me so that I can show you some of the amazing balloon art entered into this years competitions!

This years competition categories were:
Big Balloon Sculpture - 'Big Space Adventure'
Small Sculptural Form - Christmas
Dresses made from balloons - theme Russian Clothes 
I am afraid that I do not know who made all of the designs but I will endeavour to find out and add their names to each of the designs when I do.

Big Balloon Sculptures - 'Big Space Adventure'


Bride & Groom from another planet visit Paris! - By Irina Lobanova and team!

Bride & Groom from another planet visit Paris! - By Irina Lobanova and team


Small Sculptural Form - Christmas


By Irina Lobanova 

By Irina Lobanova 


Dresses made from balloons - 
Russian Clothes 


By Irina Lobanova 


Azusa Leizumi CBA, represented Qualatex and taught 3 great classes. 


Best Sellers at Azusa's Store
Balloon Dolls
Balloon Costumes for children 

Azusa & Akane

It is so very inspiring to see balloon art from different events and countries, a huge congratulations to all those who entered the competitions!

If you are planning to attend WBC 2014, I urge you to consider entering at least one competition! It will really help you to develop your design skills, and you will be amazed how rewarding it is to actually take part in a competition... competitions are not about winning, they are a personal challenge and just the best opportunity to showcase a design that you have created!

Happy Ballooning!

Sue 

www.suebowler.com